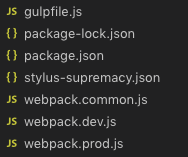
自分のgulpv4 + webpackの設定
前提
- SPAではない
- pug + stylus + vanillaを使う
- webpackのビルドはjsのファイルのみ
- 開発時と本番アップ時にビルドを分ける
ディレクトリ

コード
gulpfile.js(v4)
const { src, dest, watch, parallel } = require('gulp') //gulpを使うためのもの
const pug = require('gulp-pug') //pugを使うためのもの
const data = require('gulp-data') //jsonファイル・ディレクトリ名(bodyにclass付加)を取得するためのもの
const stylus = require('gulp-stylus') //stylusを使うためのもの
const postcss = require('gulp-postcss') //css変換後にpostcssをかけるため(ブラウザの対応のため)
const cssnext = require('postcss-cssnext') //ブラウザのリストに応じてcssを変更させるため
const plumber = require('gulp-plumber') //gulpのエラーが出ても終了させないもの
const notify = require('gulp-notify') //エラーが出たら通知を出す
const sourcemaps = require('gulp-sourcemaps') //cssのsourcemapの生成
const cleanCSS = require('gulp-clean-css') //cssの圧縮を行うもの
const browserSync = require('browser-sync') //自動読み込みのためのもの
const webpackStream = require('webpack-stream') //gulpとwebpackを接続するためのもの
const webpack = require('webpack') //webpackのバージョン指定するもの
const htmlmin = require('gulp-htmlmin') //htmlの圧縮のために使うもの
const mode = require('gulp-mode')({
  // gulp上で本番環境と開発環境を切り分けるためのもの
  modes: ['production', 'development'], //開発か本番か選択
  default: 'development', //基本は開発にする(デフォルトと同じなので非表示でも可)
  verbose: false, //詳細メッセージを表示するか(デフォルトと同じなので非表示でも可)
})
const isProduction = mode.production() //本番環境かどうかを知るために記載(本番環境ならtrue)

const webpackConfigDev = require('./webpack.dev') // 開発環境のときに実行するwebpackのファイル
const webpackConfigProd = require('./webpack.prod') // 本番環境のときに実行するwebpackのファイル
const webpackConfig = isProduction ? webpackConfigProd : webpackConfigDev //本番か開発かどちらかを判断するためのもの

const srcPath = {
  // ビルドを行うファイルの一覧
  html: [
    // html(pug)ファイルのビルドの条件
    'src/pages/**/*.pug', //pagesの中にあるディレクトリのものを読み込む
    '!' + 'src/**/_*.pug', // layouts,mixinなどの_(アンダーバー)が最初についているものについては除外
  ],
  stylus: 'src/**/*.styl', //stylus直下に入っているstylファイルのみコンンパイルを行う
  js: 'src/**/*.js', // jsのファイルのコンパイルを行う
  image: 'src/assets/img/**/*', // imgファイルのコンパイルを行う
  fonts: 'src/assets/fonts/**/*', // fontsファイルのコンパイルを行う
  static: 'src/static/**/*', // そのままコピーしたいものを貼り付ける場所
}

const destPath = {
  //出力を行うディレクトリを変数として管理する
  root: 'dist/', //htmlなどのビルドを行う時のベースのパス
  assets: 'dist/assets/', //css,jsなどのビルドを行う時のベースのパス
}

const jsFunc = () => {
  // jsファイルのコンパイルが行われたら
  // 第一引数に実行するwebpackのpath,
  // 第二引数にwebpack-streamのwebpackのバージョン(多分1系?)なので、使いたいwebpackのバージョンを指定する(バージョンはpackage.jsonのwebpack参考)
  return webpackStream(webpackConfig, webpack)
    .on('error', function(e) {
      // errorでwatchが止まらないように
      this.emit('end') //watchはendを待っているので、endを発生させることで継続させるようにする
    })
    .pipe(dest(`${destPath.assets}js/`)) // assets/js/のディレクトリに出力を行う
    .pipe(browserSync.reload({ stream: true })) // 自動リロード
}

const htmlFunc = () => {
  return src(srcPath.html) //結果をwatchへ返却する
    .pipe(
      plumber({ errorHandler: notify.onError('Error: <%= error.message %>') })
    ) // エラーが発生しても処理を継続(エラー文も表示を行う)
    .pipe(
      data(file => {
        //gulp-dataからjson,ディレクトリ名の取得を行う
        return {
          // 'peopleData': require('./src/posts/people.json'), //jsonのデータを取得(今はないのでコメントアウト)
          relativePath: file.history[0].replace(file.base, ''), // bodyのクラス名をディレクトリ名とお案じにするために記載
        }
      })
    )
    .pipe(
      pug({
        //pugからhtmlへの変換処理
        basedir: 'src', //ベースのurlを記載
        pretty: true, //整形を行うか
      })
    )
    .pipe(
      mode.production( //本番環境のみ
        htmlmin({
          //htmlの圧縮
          collapseWhitespace: true, // 余白を除去する
          minifyJS: true, // jsの圧縮
          removeComments: true, // HTMLコメントを除去する
        })
      )
    )
    .pipe(dest(destPath.root)) //指定のディレクトリに出力
    .pipe(browserSync.reload({ stream: true })) //リロード処理
}

const browsers = [
  // cssの対応するブラウザーを決める
  'last 2 versions', // メジャーブラウザの最新の2バージョンに対応
  '> 5%', //シェア5%以上のブラウザに対応
  'ie = 11', //ie11は対応
  'not ie <= 10', //バージョン10以前のieを対象から外す。
  'ios >= 8', //iOS8以上
  'and_chr >= 5', // Chrome for Android 5以上
  'Android >= 5', //Android Browserは5以上
]

const stylusFunc = () => {
  // gulp stylus で実行するタスク
  //上srcで全ファイルを対象にして、下のsrcは出力の場所の範囲のみにすることで、下層を編集してもstyle.cssのみにするようにする
  return src('src/assets/stylus/*.styl') //結果をwatchへ返却する
    .pipe(mode.development(sourcemaps.init())) // ソースマップを初期化(developのときのみ)
    .pipe(
      plumber({ errorHandler: notify.onError('Error: <%= error.message %>') })
    ) //エラーがあっても読み込みを継続(エラー文も表示)
    .pipe(stylus()) // 実際のコンパイル
    .pipe(postcss([cssnext(browsers)])) //各種ブラウザに対応させる(flexなど)
    .pipe(cleanCSS()) //1行に圧縮する
    .pipe(mode.development(sourcemaps.write())) // ソースマップの作成(developのときのみ)
    .pipe(dest(`${destPath.assets}css/`)) // assets/css/にcssのファイルを出力
    .pipe(browserSync.reload({ stream: true })) //自動読み込み
}

const imageFunc = () => {
  // gulp image で実行するタスク(コピーのみ)
  return src(srcPath.image) //結果をwatchへ返却する
    .pipe(dest(`${destPath.assets}img/`)) //指定のディレクトリに移動させる
}

const fontsFunc = () => {
  // gulp fonts で実行するタスク(コピーのみ)
  return src(srcPath.fonts) //結果をwatchへ返却する
    .pipe(dest(`${destPath.assets}fonts/`)) //指定のディレクトリに移動させる
}

const staticFunc = () => {
  // gulp static で実行するタスク(コピーのみ)
  return src(srcPath.static) //結果をwatchへ返却する
    .pipe(dest(destPath.root)) //指定のディレクトリに移動させる
}

const browserSyncFunc = () => {
  //実行時にブラウザを開く
  browserSync({
    server: {
      // ブラウザの起動を行う
      baseDir: 'dist/', // ルートとなるディレクトリ(この場合は`dist`)
      index: 'index.html', //ファイル名の指定(なくても良いが変更しやすいよう一応記載)
    },
  })
}

const watchFiles = () => { //監視ファイルの一覧
  watch(srcPath.html[0], htmlFunc) //htmlファイルの監視
  watch(srcPath.stylus, stylusFunc) //stylusファイルの監視
  watch(srcPath.js, jsFunc) //jsファイルの監視
  watch(srcPath.image, imageFunc) //imageファイルの監視
  watch(srcPath.static, staticFunc) ///staticファイルの監視
  watch(srcPath.fonts, fontsFunc) //fontsファイルの監視
}

exports.default = parallel(watchFiles, browserSyncFunc) // gulpのデフォルトの処理を記載する(ブラウザの開く処理も)

exports.build = parallel(htmlFunc, stylusFunc, jsFunc, imageFunc, staticFunc, fontsFunc) //ビルド時に行う処理
webpck.common.js
const path = require('path') //nodeモデュールの読み込み(デフォルトである)
//windowの場合、パスの区切りが`/`の場合ではない時があるので、
//__dirname + '/src' だとおかしい場合がある。なので、以下の記載で行う方が安全。
const appDir = path.resolve(__dirname, 'src')
// __dirname ・・・
// 現在実行中のソースコード(webpackのconfigがあるjs)が格納されているディレクトリの絶対パス

// module.exportsに値を設定することでエクスポートを行う。
module.exports = {
    // ビルドの対象となるディレクトリ
    context: appDir,
  //メインとなるJavascriptファイル
    entry: {
        //コンパイル前のjsのファイル(基本的なもの)
        bundle: './assets/js/common.js'
    },
    //出力の処理
  output: {
    // 出力ファイル名
    filename: '[name].js'
  },
    module: { //module.rules ↓の説明
    rules: [ // testの正規表現でヒットしたものを以下で実行させる
        {
            test: /\.js$/, // .jsのファイルなら
            exclude: /node_modules/, // node_modulesは除外
            use: [
            'babel-loader', //babel-loaderを実行
            {
                loader: 'eslint-loader',
                options: {
                failOnError: true,
                }
            }
            ],
        }
    ]
    },
}
webpack.dev.js
const merge = require('webpack-merge') //webpack.common.jsと結合させるため
const common = require('./webpack.common.js') //共通の読み込みのパスを記載する

module.exports = merge(common, {  // commonの情報を読み込んだ上で以下を読み込む
  mode: 'development', //開発者モードで作成を行う
  devtool: 'inline-source-map', //jsのソースマップの生成
})
webpack.prod.js
const merge = require('webpack-merge') //webpack.common.jsと結合させるため
const common = require('./webpack.common.js') //共通の読み込みのパスを記載する

module.exports = merge(common, { // commonの情報を読み込んだ上で以下を読み込む
  mode: 'production', //本番アップ用
  devtool: 'eval', //ソースマップなし・1行に圧縮
})
gulp-v4らしい書き方をしたい
gulpv4でgulp.taskが非推奨とのことだったので、少し変更したときのメモ。
前提条件
- html,cssを動かしたいだけなので、pug,scssの変換のみ(js,imgなどはなし)。
- ファイルの監視・ビルドがメインになるので、ローカルサーバーを立てるなどのことはしない。
変更した箇所について
変更前
v4の状態でも一応動きます。
gulpfile.js
const gulp = require('gulp')
const pug = require('gulp-pug')
const sass = require('gulp-sass')
const plumber = require('gulp-plumber')
const notify = require('gulp-notify')
const filepath = {
  src: 'src/',
  dist: 'dist/'
}
const src = {
  html: `${filepath.src}**/*.pug`,
  css: `${filepath.src}scss/*.scss`
}
gulp.task('html', () => {
  return gulp
    .src(src.html)
    .pipe(
      plumber({ errorHandler: notify.onError('Error: <%= error.message %>') })
    )
    .pipe(
      pug({
        basedir: 'src',
        pretty: true,
      })
    )
    .pipe(gulp.dest(filepath.dist))
})
gulp.task("css", () => {
  return gulp
    .src(src.css)
    .pipe(
      plumber({ errorHandler: notify.onError('Error: <%= error.message %>') })
    )
    .pipe(sass())
    .pipe(gulp.dest(`${filepath.dist}css`))
})

gulp.task('watch', gulp.series(gulp.parallel('html', 'css'), () => {
  gulp.watch(src.html, gulp.task('html'))
  gulp.watch(src.css, gulp.task('css'))
}))

gulp.task('default', gulp.task('watch'))
gulp.task('build', gulp.parallel('html', 'css'))
変更後
const { src, dest, watch, parallel } = require('gulp')
const pug = require('gulp-pug')
const sass = require('gulp-sass')
const plumber = require('gulp-plumber')
const notify = require('gulp-notify')
const filepath = {
  src: 'src/',
  dist: 'dist/'
}
const filesrc = {
  html: `${filepath.src}**/*.pug`,
  css: `${filepath.src}scss/**/*.scss`
}

const html = () => {
  return src(filesrc.html)
    .pipe(
      plumber({ errorHandler: notify.onError('Error: <%= error.message %>') })
    )
    .pipe(
      pug({
        basedir: 'src',
        pretty: true,
      })
    )
    .pipe(dest(filepath.dist))
}

const css = () => {
  return src(filesrc.css)
    .pipe(
      plumber({ errorHandler: notify.onError('Error: <%= error.message %>') })
    )
    .pipe(sass())
    .pipe(dest(`${filepath.dist}css`))
}

exports.default = () => {
  watch(filesrc.html, html)
  watch(filesrc.css, css)
}
exports.build = parallel(html, css)
参考にしたリンク
IsometricSassを使って3D表現をやってみる
IsometricSassを使うとcssのみで3D表現できるので、それをいろいろとさわってみる。
参考url一覧
github
やっていることの参考url
行ったこと
事前準備
HTML : html
CSS : sass(isometricがsassを使っているので、)
sassビルド : Easy Sass(参考url)
isometricをローカルに入れる
https://github.com/MorganCaron/IsometricSass/blob/master/src/sass/_isometric.sassのファイルを自分のcssファイルと同じ場所に入れる
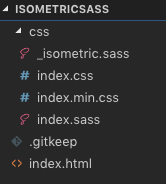
ディレクトリ

Context
html
<div class="isometric-container">
  <div class="isometric">
    2d <br>Isometric
  </div>
</div>
sass
@import isometric
結果

Grid
html
<div class="isometric-container">
  <div class="isometric">
    <div class="grid"></div><!--ここを変更-->
  </div>
</div>
sass
@import isometric

// ここから追記
$size: 5rem

.grid
    +grid($size, 1%, mediumorchid)
    width: $size*5
    height: $size*5
自分の環境だと $size: 1rem だとサイズが小さくて見えなかったので、5remに変更。
結果

Plane
html
<div class="isometric-container">
  <div class="isometric">
    <div class="plane"></div> <!--ここを変更-->
  </div>
</div>
sass
@import isometric

// ここから追記
$size: 5rem

.plane
  +plane($size, $size, darkcyan)
結果

Border
html
<div class="isometric-container">
  <div class="isometric">
    <div class="plane"></div>
  </div>
</div>
sass
@import isometric

// ここから追記
$size: 5rem

.plane
  +plane($size, $size, darkcyan)
  +border(5px, black) //ここ追記
結果

Edge
html
<div class="isometric-container">
  <div class="isometric">
    <div class="plane"></div>
  </div>
</div>
sass
@import isometric

// ここから追記
$size: 5rem

.plane
  +plane($size, $size, darkcyan)
  +edge(5px, darkcyan) //ここを変更
結果

Shadow
html
<div class="isometric-container">
  <div class="isometric">
    <div class="plane"></div>
  </div>
</div>
sass
@import isometric

// ここから追記
$size: 5rem

.plane
  +plane($size, $size, darkcyan)
  +edge(5px, darkcyan) //ここを変更
結果

Cube
<div class="isometric-container">
  <!--ここから変更-->
  <div class="isometric">
    <div class="cube">
      <div></div>
      <div></div>
      <div></div>
      <div></div>
      <div></div>
      <div></div>
    </div>
  </div>
</div>
sass
@import isometric

$size: 5rem

// ここから追記
.cube
  +cube($size, $size, $size, darkcyan)
結果

Position
html
<div class="isometric-container">
  <div class="isometric">
    <div class="plane"></div>
    <div class="grid"></div>
  </div>
</div>
sass
@import isometric

$size: 5rem

.plane
  +plane($size, $size, darkcyan)
  //ここから
  top: $size
  left: $size*2
  transform: translateZ($size*.5)

.grid
    +grid($size, 1%, mediumorchid)
    width: $size*5
    height: $size*5
結果

Animation
html
<div class="isometric-container">
  <div class="isometric">
    <div class="plane"></div>
    <div class="grid"></div>
  </div>
</div>
sass
@import isometric

$size: 5rem

.plane
  +plane($size, $size, darkcyan)
  +animation(planeAnimation, transform, translateZ(0), translateZ($size), 0s, 2s, alternate infinite) //animetion

.grid
  +grid($size, 1%, mediumorchid)
    width: $size*5
    height: $size*5
結果

Move Shadow
html
<div class="isometric-container">
  <div class="isometric">
    <div class="plane"></div>
    <div class="grid"></div>
  </div>
</div>
sass
@import isometric

$size: 5rem

.plane
  +plane($size, $size, darkcyan)
  +animation(planeAnimation, transform, translateZ(0), translateZ($size), 0s, 2s, alternate infinite)
  +moveShadow(planeShadow, 0, $size, .2, .4, 0s, 2s, alternate infinite) //影のアニメーション

.grid
    +grid($size, 1%, mediumorchid)
    width: $size*5
    height: $size*5
結果

Rotate
html
<div class="isometric-container">
  <div class="isometric">
    <div class="plane"></div>
    <div class="grid"></div>
  </div>
</div>
sass
@import isometric

$size: 5rem

.plane
  +plane($size, $size, darkcyan)
  +animation(planeAnimation, transform, translateZ(0), translateZ($size), 0s, 2s, alternate infinite)
  +moveShadow(planeShadow, 0, $size, .2, .4, 0s, 2s, alternate infinite)
  +rotate(planeRotate, 0deg, 360deg, 0s, 7s) //回転のアニメーション

.grid
    +grid($size, 1%, mediumorchid)
    width: $size*5
    height: $size*5
結果

実行させてみて
さわっていけば画像のところまでいけるらしいので、これからもちょこちょこさわっていきたい。

ドキュメントのものがsassしかないので、自分用とかにscssとstylusも作っていきたい。
scss版
stylusのlintを導入
stylusでのlintについて stylus-supremacyのここの部分に記載されていたので、自分の環境構築しているものに導入してみたのでその時のメモです。 今回の場合だと入れただけで、運用してみてどうとかこの使い方で使いやすいのかはまだ検証は行っていないです。
また、主に stylus-supremacyのここの部分かstylintのnpmページを参考にしています。
npmのインストール
コマンド
npm i stylint
デフォルトの設定
.stylintrcを作成
{
  "blocks": false,
  "brackets": "never",
  "colons": "always",
  "colors": "always",
  "commaSpace": "always",
  "commentSpace": "always",
  "cssLiteral": "never",
  "customProperties": [],
  "depthLimit": false,
  "duplicates": true,
  "efficient": "always",
  "exclude": [],
  "extendPref": false,
  "globalDupe": false,
  "groupOutputByFile": true,
  "indentPref": false,
  "leadingZero": "never",
  "maxErrors": false,
  "maxWarnings": false,
  "mixed": false,
  "mixins": [],
  "namingConvention": false,
  "namingConventionStrict": false,
  "none": "never",
  "noImportant": true,
  "parenSpace": false,
  "placeholders": "always",
  "prefixVarsWithDollar": "always",
  "quotePref": false,
  "reporterOptions": {
  "columns": ["lineData", "severity", "description", "rule"],
  "columnSplitter": " ",
  "showHeaders": false,
  "truncate": true
  },
  "semicolons": "never",
  "sortOrder": "alphabetical",
  "stackedProperties": "never",
  "trailingWhitespace": "never",
  "universal": false,
  "valid": true,
  "zeroUnits": "never",
  "zIndexNormalize": false
}
stylus-supremacyのここの部分の画像の部分でも記載されていますが、
 を貼り付けてjs上に貼り付けていろいろ触ってみるとわかりやすかった。
RunJSを使って少し触ってみた様子

現状実際のプログラムを使って実装などについてはとくに行っていないので、自分で細かく設定してしまうと予期せぬエラーが起こる&時間がかかるという点からstylint-stylishを使ってルールの設定を行いました。
自分の.stylintrc設定
{
  "reporter": "stylint-stylish",
  "reporterOptions": {
    "absolutePath": false
  },
  "noImportant": true,
  "semicolons": {
    "expect": "never",
    "error": true
  }
}
自分のルールとして仮ですが、
- ファイル読み込みは絶対参照にしない
- !importantは使用しない
- セミコロンは使わない
にしています。
また、コマンドなどについては
"scripts": {
  "supremacy": "stylus-supremacy format ./src/**/*.styl -p ./stylus-supremacy.json -r", //stylusの整形
  "stylint": "stylint src/assets/stylus", //stylusのlint
  "commit:stylint": "yarn run supremacy && yarn run stylint" // stylusを整形した後にlint
},
"lint-staged": {
  "*.styl": [
    "yarn run commit:stylint", //commit時に整形&lintを行うため
    "git add"
  ]
}
にすることで整形&lint漏れは無くなるのかなと思います。(実際に運用して懸念点があった場合、追記していきます。)
stylus + jsの整形ルール
stylus + eslint の整形メモ
stylus
本当はstylelint入れたかったけど。。(scssでは対応していると書いてあったけどstylusまではわからなかった。)
stylusでいい感じに設定してくれるとのことでstylus-supremacyを使用。lintというよりは整形を行ってくれるもの
インストール
$ npm i stylus-supremacy
使う
srcの中にあるファイルを対象とした場合
"scripts": {
   "supremacy": "stylus-supremacy format src/**/*.styl -p stylus-supremacy.json -r"
  }
設定用のjsonの中身
詳しくは stylus-supremacyのページでも見ることができます。
{
  "stylusSupremacy.insertColons": false,
  "stylusSupremacy.insertSemicolons": false,
  "stylusSupremacy.insertBraces": false,
  "stylusSupremacy.insertNewLineAroundImports": "root",
  "stylusSupremacy.insertNewLineAroundBlocks": "root",
  "stylusSupremacy.insertNewLineAroundProperties": false,
  "stylusSupremacy.insertNewLineAroundOthers": false,
  "stylusSupremacy.preserveNewLinesBetweenPropertyValues": false,
  "stylusSupremacy.insertSpaceBeforeComment": true,
  "stylusSupremacy.insertSpaceAfterComment": true,
  "stylusSupremacy.insertSpaceAfterComma": true,
  "stylusSupremacy.insertSpaceInsideParenthesis": false,
  "stylusSupremacy.insertParenthesisAfterNegation": false,
  "stylusSupremacy.insertParenthesisAroundIfCondition": false,
  "stylusSupremacy.insertNewLineBeforeElse": false,
  "stylusSupremacy.insertLeadingZeroBeforeFraction": true,
  "stylusSupremacy.selectorSeparator": "\n",
  "stylusSupremacy.tabStopChar": "\t",
  "stylusSupremacy.newLineChar": "\n",
  "stylusSupremacy.quoteChar": "'",
  "stylusSupremacy.sortProperties": "grouped",
  "stylusSupremacy.alwaysUseImport": false,
  "stylusSupremacy.alwaysUseNot": false,
  "stylusSupremacy.alwaysUseAtBlock": false,
  "stylusSupremacy.alwaysUseExtends": false,
  "stylusSupremacy.alwaysUseNoneOverZero": false,
  "stylusSupremacy.alwaysUseZeroWithoutUnit": true,
  "stylusSupremacy.reduceMarginAndPaddingValues": true,
  "stylusSupremacy.ignoreFiles": []
}
js
eslintでチェックを行い、prettierで整形を行う
eslint, eslint-config-prettier, eslint-loader, eslint-plugin-prettier を使う
インストール
$ npm i eslint eslint-config-prettier eslint-loader eslint-plugin-prettier
使い方
srcの中にあるファイルを対象とした場合
"scripts": {
   "eslint": "eslint --fix src",
  }
設定用のファイルの中身
{
  "root": true,
  "env": {
    "es6": true
  },
  "extends": [
    "eslint:recommended",
    "plugin:prettier/recommended"
  ],
  "globals": {
    "window": true,
    "document": true
  },
  "rules": {
    "prettier/prettier": [
      "error",
      {
        "printWidth": 120,
        "singleQuote": true,
        "trailingComma": "es5",
        "semi": false
      }
    ]
  },
  "parserOptions": {
    "sourceType": "module"
  }
}
上記の2つをcommitしたら反応するようにする
毎回 npm run eslint とか打ちたくないので、
lint-staged と husky を使用する
インストール
$ npm i husky lint-staged
使い方
"lint-staged": {
    "*.styl": [
      "stylus-supremacy format src/**/*.styl -p stylus-supremacy.json -r",
      "git add"
    ],
    "*.js": [
      "eslint --fix src",
      "git add"
    ]
  },
を設定して、あとはコミットするだけ。
stylusについてはコミットしたら整形を行うだけなので、 コミットの宣言 → 整形 → コミットの反映になるが、
eslintはエラー修正も行うので、 コミットの宣言 → 整形(エラーがあったらコミットしない) → コミットの反映 になる。
最後に
導入してみたら自動的に整形を行ってくれるのでコードを書くのが少し楽になった。 メモとして最低限書いただけなので、時間のある時にもう少しまとめていきたい。